Brachiograph
In den wesentlichen Punkten fertig , kleinere Ergänzungen folgen.
Am Anfang war der Eisstilplotter
Beim Lesen der Neuigkeiten online wurde dieser Eisstilplotter entdeckt.
https://www.heise.de/make/meldung/BrachioGraph-Eisstielplotter-mit-Raspberry-Pi-4653448.html
Er wird auch Brachiograph genannt
Viele Details findet man im Ursprungsprojekt https://www.brachiograph.art/
Das ist ein Raspberry Pi Projekt - sollte das nicht auch mit dem ESP32 gehen? Ein Webserver auf meinem Laptop könnte die Koordinaten für die zu zeichnende Linie liefern, der ESP32 holt sich das ab und steuert mit Servos den Stift.
Mechanik
Die Umsetzung der Mechanik wurde mit PVC-Profilen aus dem Baumarkt etwas stabiler ausgeführt. Der Arm wird durch das Basis-Servo gehalten, das Ellbogen-Servo hängt in der Luft und die zweite Auflage bildet die Spitze des Stiftes. Das Servo am Schreibstift macht nur einen kleinen Winkel um den Stift ggf. anzuheben.
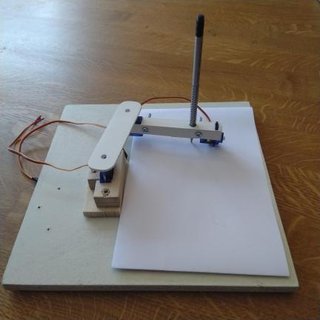
Das ist natürlich immer noch kein genauer Plotter, aber die Umsetzung macht Spaß von der Berechnung der Koordinaten bis Code zum Ansteuern der Servos.
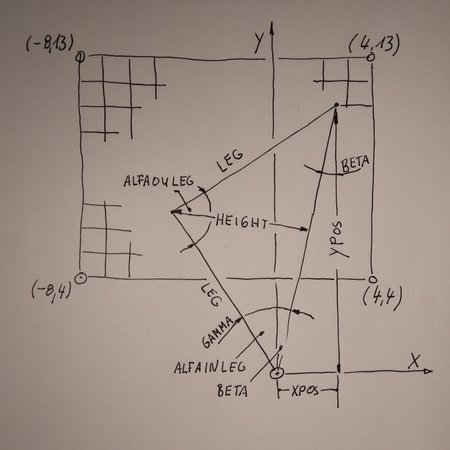
Etwas Mathematik
Mit einer Skizze kann man sich die Berechnung der Winkel für die Servos herleiten.
Wie man leicht sieht …
Code zur Winkelberechnung
Im Code sieht das dann so aus.
/Calculation Servo Angles for actual position

// global variables
// position to catch: (XPos, YPos)
// lenght of both legs: Leg
// output variables are the angles for the servos - AlfaInLeg, AlfaOuLeg

// auxiliary variables
float Beta;
float Height;
float Gamma;
float AlfaInLegCalc;
float AlfaOuLegCalc;


void CalcPositionAngle()
{


Serial.println("calulated position angles are");

Beta = 360/3.1416/2*atan(XPos/YPos);
// Serial.println(Beta);
Height = sqrt(Leg*Leg-(XPos*XPos+YPos*YPos)/4);
// Serial.println(Height);
Gamma = 360/3.1416/2*asin(Height/Leg);
// Serial.println(Gamma);

// estimated values for AlfaInLeg are from -134.8 to -42.6 degres should be corrigated
// with +140 degres to be from 5.2 to 97.4
// estimated values for AlfaOuLeg are from 4.4 to 68 degres

AlfaInLegCalc = 60 + (Gamma - Beta); //transfered coordinate system to 140°
AlfaOuLegCalc = 180 - 2*(90-Gamma);

AlfaInLeg = (int) AlfaInLegCalc;
AlfaOuLeg = (int) AlfaOuLegCalc;

Serial.print("AlfaInLeg "); Serial.print(AlfaInLeg); Serial.print(" AlfaOuLeg "); Serial.println(AlfaOuLeg);
//delay(1000);
}
Wertebereich und Genauigkeit
Ich hatte mit den Formeln über LibreOfficeCalc den Wertebereich bestimmt. Dabei wird klar, dass es Bereiche gibt, in denen eine kleine Winkeländerung eine Große Wirkung hat. Durch die Servos und ungenügende Steifigkeit ist den Plotter schon wenig präzise und er ist in diesen Bereichen nochmals schlechter.
Ansteuerung der Servos und deren Montage
Um das Grundprinzip der Servos zu verstehen hatte ich mir dies angeschaut.
https://randomnerdtutorials.com/esp32-servo-motor-web-server-arduino-ide/
Sehr schön erklärt. Damit bring man die Servos in die richtige Montageposotion und sieht auch, ob das Servo bei einer Ansteuerung von -90 Grad bis + 90 Grad auch komplette 180 Grad fährt oder, wie bei mir, noch ein Korrekturfaktor notwendig wird.
Schnittstellendefinition zum Abholen der Steuerungsdaten
Serverseitig
Die Schnittstelle vom Laptop zum ESP32 habe ich einfach gestaltet.
Der Apache-Server auf meinem Laptop liefert die Anforderung an den Plotter in einzelnen Json-Files.
Erstes File ### 1.html ``` {"XGo":-8, "YGo":13, "Pen":1} ```
Zweites File
2.html
{"XGo":4, "YGo":13, "Pen":1}
Diese enthalten demnach jeweils nur die mit dem Stift anzusteuernden Koordinaten und zusätzlich den Hinweis, ob der Stift beim Verfahren abgesenkt (1) oder angehoben (0) wird.
### Letztes File Beim letzten File setze ich schließlich "Pen":-1} und beende so das Zeichnen.
ESP Schnittstellenseite
Der ESP holt sich das mit dieser Routine ab
// Modifiziertes Script von https://techtutorialsx.com/2016/07/17/esp8266-http-get-requests/
// added by mancas@22x22.org

void GetJsonData()
{
String Line;

Serial.println("working on GetJsonData");
//delay(5000);

if (WiFi.status() == WL_CONNECTED) { //Check WiFi connection status

HTTPClient http;  //Declare an object of class HTTPClient

String httpCall;
httpCall = "http://192.168.63.248/" + String(IndexCounter) + ".html";

Serial.print(" called adress "); Serial.println(httpCall);

//http.begin("http://192.168.63.6/index.html");  //Specify request destination
http.begin(httpCall);

int httpCode = http.GET();                                                                  //Send the request
Serial.print(" - httpCode is ");
Serial.println(httpCode);

if (httpCode > 0) { //Check the returning code

Line = http.getString();   //Get the request response line

Serial.print("Response from Server "); Serial.println(Line);                     //Print the response from server
//Serial.println(" ----------------------------------------------------------- ");
//delay(1000);
http.end();   //Close connection


}

// Allocate JsonBuffer  // Leh
  // Use arduinojson.org/assistant to compute the capacity.
  const size_t capacity = JSON_OBJECT_SIZE(3);
  DynamicJsonBuffer jsonBuf(capacity);

//  DynamicJsonBuffer jsonBuf;
  JsonObject &root = jsonBuf.parseObject(Line);
  if (!root.success())
  {
    Serial.println("parseObject() ------------- FAILED -----------");
    Serial.println("TAKE MY TEST VALUES XGo 1.5, YGo 13.0, Pen 1");
    XPosTarget = 1.5;
    YPosTarget = 13.0;
    Pen = 1;

    Serial.println("Target to draw");
    Serial.print(XPosTarget); Serial.print(","); Serial.print(YPosTarget); Serial.print(" Pen "); Serial.println(Pen);
    return;
  }

// Here is an example of the expected response:
// {"XGo":1.5, "YGo":13.0, "Pen":1}
// Last Line recognized if "Pen" is set to -1

  XPosTarget = root["XGo"];
  YPosTarget = root["YGo"];
  Pen = root["Pen"];

  Serial.println("json was correct processed, target to draw from ");
  Serial.print(XPosStart); Serial.print(","); Serial.print(YPosStart);
  Serial.println(" to ");
  Serial.print(XPosTarget); Serial.print(","); Serial.print(YPosTarget); Serial.print(" Pen "); Serial.println(Pen);
  IndexCounter +=1;

}

}
Kleine Zeichenschritte ergeben eine Linie
Der Weg wird in kleine Schrittchen zerlegt und abgefahren.
void GoThePath()
{

//Auxiliary variables
float Path;
float AlfaPath;
float StepWide;
int StepNumber;
int counter;

StepWide = 0.05;

Path = sqrt((XPosTarget-XPosStart)*(XPosTarget-XPosStart)+(YPosTarget-YPosStart)*(YPosTarget-YPosStart)); //Vector to go
AlfaPath = asin((YPosTarget-YPosStart)/Path);
//AlfaPath = atan((YPosTarget-YPosStart)/(XPosTarget-XPosStart)); // angle of the path
StepNumber = (int) (Path / StepWide); //go the path in steps of StepWide

Serial.print("I will go the path lenght of ");Serial.print(Path);Serial.print(" in "); Serial.print(StepNumber); Serial.println(" Steps");

for (counter = 1; counter <= StepNumber; counter +=1) {

//XPos = XPosStart + counter * StepWide * cos(AlfaPath);
YPos = YPosStart + counter * StepWide * sin(AlfaPath);

if (XPosTarget <= XPosStart) {XPos = XPosStart - counter * StepWide * cos(AlfaPath);}
if (XPosTarget > XPosStart) {XPos = XPosStart + counter * StepWide * cos(AlfaPath);}
//if (YPosTarget <= YPosStart) {YPos = YPosStart - counter * StepWide * sin(AlfaPath);}
//if (YPosTarget > YPosStart) {YPos = YPosStart + counter * StepWide * sin(AlfaPath);}


// catch calculation bugs of the lousy programmer and save the mechanic
    if (((XPos < -10) || (XPos > 6)) || ((YPos < 2) || (YPos > 15))) {
    Serial.println("EXIT 1");
    Serial.println("EXIT 1");
    Serial.println("EXIT 1");
    Serial.println("EXIT 1");return;}


//  Serial.println();
  Serial.print("intermediate Step "); Serial.print(counter); Serial.print(" ");Serial.print(XPos); Serial.print(","); Serial.println(YPos);
  CalcPositionAngle();

  myservoInLeg.write(AlfaInLeg);
  myservoOuLeg.write(AlfaOuLeg);
  myservoPen.write(40);
  Serial.println("--- Servos are turned ---");
  delay(10);

}

//last step to do
XPos = XPosTarget;
YPos = YPosTarget;
//Serial.println();
Serial.print("final Step "); Serial.print(XPos); Serial.print(","); Serial.println(YPos);
CalcPositionAngle();

 myservoInLeg.write(AlfaInLeg);
  myservoOuLeg.write(AlfaOuLeg);
  myservoPen.write(500);
  Serial.println("--- Servos are turned ---");
  delay(10);

}
Alles zusammen geschnürt
Das Haupprogramm ruft die Routinen ab
/*** Brachiograf
  by mancas@lug-saar.de
  light example of the brachiograph plotter with arduino ESP32
  see brachiograph.art

  modified 19 Jun 2020
  by mancas
***/


#include <Arduino.h>
#include <Servo.h>
#include <WiFi.h>
//#include <WiFiMulti.h>
#include <HTTPClient.h>
#include <ArduinoJson.h>
#include <WiFiUdp.h>

void TestRoutine();
void CalcPositionAngle();
void GetJsonData();
void GoThePath();

// WiFi Daten
const char* ssid     = "xxx";     // SSID of local network
const char* password = "xxx";   // Password on network


// Globale Variables
float XPosStart; float XPos;    float XPosTarget;
float YPosStart; float YPos;    float YPosTarget;
int Pen;
int IndexCounter = 1;

int AlfaInLegStart; int AlfaInLeg; int AlfaInLegTarget;
int AlfaOuLegStart; int AlfaOuLeg; int AlfaOuLegTarget;
int Leg = 8;

Servo myservoInLeg;  // create servo objects to control
Servo myservoOuLeg;
Servo myservoPen;


void setup() {

Serial.begin(115200);
//  initMAX7219();
//  sendCmdAll(CMD_SHUTDOWN, 1);
//  sendCmdAll(CMD_INTENSITY, 0);
Serial.println("----------------------------------------------------------------------------------------------");
Serial.println("----------------------------------------------------------------------------------------------");
Serial.println("----------------------------------------------------------------------------------------------");

  Serial.print("taking connection to the WiFi ");
  WiFi.begin(ssid, password);
//  printStringWithShift("Verbinde", 15);
  while (WiFi.status() != WL_CONNECTED) {
    delay(500);
    Serial.print(".");
  }

Serial.println("");
Serial.print("I am connected to your Wifi as "); Serial.println(WiFi.localIP());

// initialise servos
// Allow allocation of all timers
//  ESP32PWM::allocateTimer(0);
//  ESP32PWM::allocateTimer(1);
//  ESP32PWM::allocateTimer(2);
//  ESP32PWM::allocateTimer(3);

//  myservoInLeg.setPeriodHertz(50);  // create servo objects to control
//  myservoOuLeg.setPeriodHertz(50);
//  myservoPen.setPeriodHertz(50);

//  myservoInLeg.attach(13, 1000, 2000);
//  myservoOuLeg.attach(16, 1000, 2000);
//  myservoPen.attach(17, 1000, 2000);
  // attaches the servo on pin 13 to the servo object
  // using default min/max of 1000us and 2000us
  // different servos may require different min/max settings
  // for an accurate 0 to 180 sweep


// initialise und set start variables

myservoInLeg.attach(13);  // attaches the servo on GPIO13 to the servo object
myservoOuLeg.attach(16);  // attaches the servo on GPIO16 to the servo object
myservoPen.attach(17);    // attaches the servo on GPIO17 to the servo object
// Recommended PWM GPIO pins on the ESP32 include 2,4,12-19,21-23,25-27,32-33

//StartPosition
XPosStart = -8;
YPosStart = 8;
Pen = 0;

XPos = XPosStart;
YPos = YPosStart;

Serial.println("booting is ready, time to put power to the servos");
Serial.println("will go to start position with the servos");
Serial.print("set to start position"); Serial.print("("); Serial.print(XPosStart);Serial.print(",");Serial.print(YPosStart); Serial.println(")");
Serial.println("that means inner legs position is set to nine o'clock and outer legs position is zwelve o'clock and pen is up");
//Serial.println("call subroutine CalcPositionAngle");
CalcPositionAngle();
//Serial.println("finished with CalcPositionAngle");

myservoInLeg.write(AlfaInLeg);
myservoOuLeg.write(AlfaOuLeg);
myservoPen.write(10); // pen is up
Serial.println("I have finished my initialisation programm and wait 5 seconds to check servo positions");
delay(5000);

}


void loop() {
Serial.println("I fetch my new drawing target from server");  //get new XPosTarget and YPosTarget

if (Pen >=0){GetJsonData();}

if (Pen >=0) {


if (((XPosTarget >= -8) && (XPosTarget <= 4)) && ((YPosTarget >= 4) && (YPosTarget <= 13))) {

  if ((XPosStart != XPosTarget) || (YPosStart != YPosTarget)) {
  GoThePath(); //draw the pencil to new position

XPosStart = XPosTarget; //Target is the new start position for next line
YPosStart = YPosTarget;
//CalcPositionAngle();
  } else {Serial.print("waiting for next drawing order");}

} else {Serial.println("valuse are out of range, will do nothing");}


} else {Serial.println("Pen -1 is my signal, that I have finished my last drawing target"); delay(30000);}

}
Das Ergebnis
Es gibt noch zu tun
Im Code sind Anheben und Absenken des Stiftes sowie Winkel-Korrekturfaktor für die Servos noch nicht umgesetzt.
Viel Spaß beim Nachbauen und Ergänzen.